
DIY Gel Nails

I'm a huge fan of gel polish manicures, but they can get pretty expensive pretty fast especially if you're getting them done every two to three weeks. So in an effort to cut down on time at the nail salon (don't worry, I'll still be going in every so often to get these crazy cuticles under control), I went on the hunt for an at home solution that didn't include buying my own gel kit.
After a bit of searching, I stumbled upon Gelous Advanced Nail Gel Coat, and thought I'd give it a try! When I was checking out at Sally's, the lady at the counter said the Gelous was great and they hadn't gotten a single complaint about it yet. So I gathered all of my nail polish supplies:
- Seche Vite Dry Fast Top Coat
- American Classics Gelous Advanced Nail Gel Coat
- Ulta Salon Formula Nail Lacquer in Eye Popping Poppy

Let's get started!
- Begin by applying two thin coats of Gelous to your clean dry nails, allowing a few minutes in between each coat for it to dry (about 3 or so minutes).
- Once the Gelous has dried, apply a thin coat of your color nail polish and let it dry (5 minutes or so).
- Apply a thin coat of Gelous and let that dry (2-3 minutes) making sure to swipe the tips of your nails to seal in the edges.
- Apply another thin coat of your color nail polish, let that dry (2-3 minutes).
- Apply your top coat (you want it to be a fast drying and Seche Vite is my new favorite - I don't know how I'm just now starting to use it!).
- Let all of those layers dry and you're done!
I did my nails right after dinner so they had a bit of time to dry before I went to bed. I let them dry overnight and when I woke up in the morning I was sure I would have sheet marks - but I didn't! Victory! I don't think this will last two weeks or more like normal gel nail polish, but if it can hold up for a week that's better than any regular polish in my book!

I'll post an update to this DIY to see how long the polish lasts, but so far so good! It feels a bit stronger than my normal manicure so that's a hopeful sign!

Do you normally get gel polish done when you get your nails done? Let us know if you try this out and how you like it!

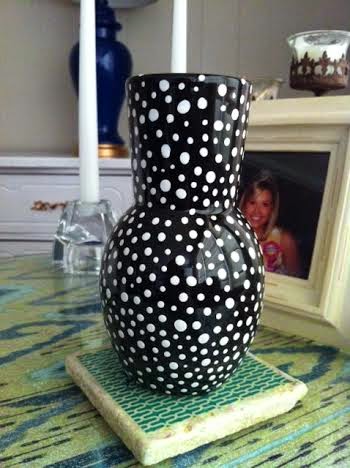
A little while back, I saw this adorable dot planter at Anthropologie. And my first thought was, "Oh, hello there lovely." And my second thought was, "I kill plants." Okay, just kidding. But I really do. My second thought was, "I could totally make this."

What's even better is that you only need three supplies for this project. Hollaaaa. So here's what you'll need:

Yup. That's it. I used Rustoleum's oil-based gloss white paint. And here are the steps you'll need to take:
1. Clean your vase off with water, making sure it's completely dry after.
2. Dip a toothpick into the paint lightly (you don't need much!).
3. Start adding dots with the paint in whatever pattern you'd like, making sure not to put too much paint on at once otherwise it will drip (I worked from the bottom up, let it dry overnight, continued with the top, then let it dry overnight again).
4. You're done! Enjoy your new vase!
Let us know if you make one! Have you made any other Anthro dupes? We'd love to see your projects!
DIY Gold Elephant

For those of you who followed me over at The Eclectic Owl, you may have already seen this DIY, but we thought it was too good not to share here! While I was checking out at Joann's one day last year, I saw this gray toy elephant (Roll Tide!) in the checkout aisle...

Now, while cute on its own, he wasn't terribly stylish. So, I gathered my supplies to make him a

Here is what you'll need:
- 1 plastic toy animal
- white primer spray paint
- metallic gold spray paint
- clear acrylic sealer
Instructions:
Begin by priming the toy on all sides. I found it best to put the toy on its back and spray with primer. Then once that has dried, turn the toy on one side, then the other and finally place it in the standing position making sure that it is dry in between movements. Once you have finished the first coat of primer, repeat the previous steps with a second coat of primer.
Repeat the application process with the gold spray paint, doing two coats.
Repeat the application process with the clear acrylic sealer, doing just one coat. Let it dry completely and you're done!
.JPG)


Now you have an adorable gold elephant for your bookcase for under $10! After I did mine last year, Maeci did one, too! I think it turned out SO great and totally looks like a little brass elephant...

So cute, right?

And do you see that in the mirror? It's the DIY feather gold art tutorial we showed you last month!

So go make one and send us your photos!
DIY Tassel Necklace
So we've all seen those adorable tassel necklaces around, right? So cute. I die. But I didn't want to spend $30 on one necklace that I knew I could easily make myself. When I saw these tassel necklaces at Furbish, I knew I could make one nearly identical for less than half the price!
via Furbish
So, I set out on gathering my supplies...

- (2) Embroidery threads (Cotton Pearl #5 in Placid is the blue color I used)
- Jump Ring (I used a 15mm heavy gauge jump ring in Gold from Hobby Lobby. I couldn't find the exact one online, but these are the same size, same brand and nearly the same color.)
- Wooden beads (I used two packages of these, but feel free to get creative!)
- Scissors
- Tape (Scotch tape or any sort will work. This makes threading your beads easier.)
Instructions:
Start by taking your first embroidery thread and unwinding it, but keeping it intact as shown below.

You'll want to remove about 5-6 strands, still keeping the bulk of the thread intact. After removing those few strands, take the larger piece and place it through one of the jump rings like so:

Then, cut through the loops at the ends of the embroidery thread of the larger piece (the one with the jump ring in the center). You'll now have these two separate pieces:

Fold the piece in the jump ring in half making sure the ends match up...

Take the few strands you removed and tightly knot them around the base of the jump ring securing the larger strands...

Pull the strands so that half of them face downward and blend in with the other strands in your newly formed tassel (and excuse the fact that my manicure is a little cray-cray):

Snip off the top bits of thread from the one you used to secure the tassel, trim your tassel ends and fluff them up a bit! The shorter your tassel the fluffier it will be (fluffier = technical term).

You can stop here and use your tassel on an existing chain OR continue on to create your own!
Next, you'll want to take your other package of embroidery thread and make it the length you desire for your necklace. I started out with mine really long to ensure that I had enough thread to create little knots in between each bead. You can also simply make it the length you'd like and add the beads to they touch back-to-back.
Then take that thread and move it through the jump ring, making sure to tie it and knot it so that each side is the same length...

Now, you're going to make yourself comfortable and grab a glass of wine. And you're absolutely going to want to make sure there's a Law and Order SVU marathon on. Okay, maybe that's only what I did. We can't all be perfect.
Add a little tape to the end of your thread strands and start by putting one bead through. Then make a knot after and continue with another bead. Keep this going until your entire strand is finished.


And here are the two I made:

Oh, hello there. Why yes, yes I am wearing two necklaces I made.


Super easy and super cute, right?! So, now you can make one! Be sure to let us know if you do. We'd love to see yours!
DIY Gold Feather Art
A few months ago, I got a wild hair to redo R.B.'s guest bathroom. Unfortunately, I didn't take many before/after pics. But I did document a DIY project that I'm really excited about!
I wanted something inexpensive, and I couldn't find anything worth purchasing. So, I decided to make something myself.

I ran across these DIY Gold Paper Feathers on Pinterest and discovered Lia Griffith's awesome blog. She has tons of free printables, DIY ideas and crafty tutorials. You should definitely check her out.


I also sprayed a clear gloss over the black poster board I used for the background.
And because I was so happy with how it turned out, I decided to do a grouping for the bathroom...

I wanted something inexpensive, and I couldn't find anything worth purchasing. So, I decided to make something myself.
I ran across these DIY Gold Paper Feathers on Pinterest and discovered Lia Griffith's awesome blog. She has tons of free printables, DIY ideas and crafty tutorials. You should definitely check her out.
Here's what you'll need:
- Lia Griffith's downloadable paper feather template
- Inexpensive black wall frames (Mine are from Walmart)
- Photo matte (I got mine cut at Hobby Lobby after I had finished the project because they're a weird size)
- Black poster board (I got one sheet and cut it into squares to use in all 3 frames)
- Rubber cement to glue the feathers to the poster board
- Gold spray paint
- Clear gloss spray paint
- Scissors
I followed Lia's steps for making the feathers look a little more realistic. She has a great graphic at the bottom of her post on how to do that. But I basically folded the feathers in half to create an indentation down the middle and "fringed" the edges.
Instead of using gold foil like Lia, I decided to use gold spray paint because it dries faster and I had some at home (use what you have on hand!). I also sprayed a clear gloss over the gold.
Here's the finished product:
I also sprayed a clear gloss over the black poster board I used for the background.
And because I was so happy with how it turned out, I decided to do a grouping for the bathroom...
This was such an easy and inexpensive project, but it looks really great in our space. R.B. was super impressed.
Of course, this project is totally customizable to your space. You can use different colors and different frames. Or you can use these to decorate gifts like Lia, create a feather garland...the options are endless!
Let us know what you create!
No comments:
Post a Comment