And it's totally a Monday, y'all. In every sense of the word and day. So today, I'll just leave y'all with this tidbit.

Monday, June 30, 2014
Manic Monday
Guys, Maeci and R.B.'s wedding was completely beautiful, fun and totally them. There were light up tambourines, neon colored sunglasses (think Tom Cruise in Risky Business) and even glow sticks. So while they're on their honeymoon, it's just going to be you and me. #sorrynotsorry

Thursday, June 26, 2014
Summer Wedding Wear
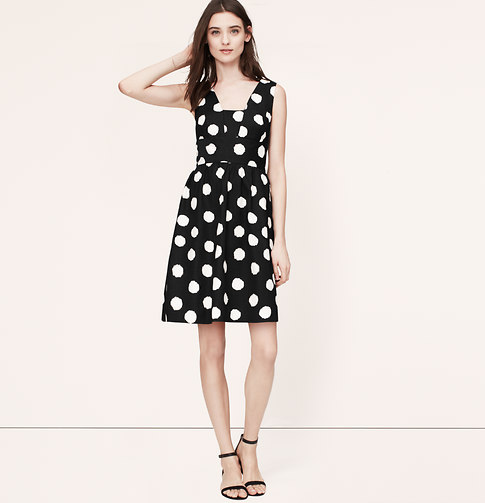
With Maeci's wedding this weekend (that's right R.B., I said Maeci's wedding), I thought it would be fun to look at a few dress options for guests. Lord knows, I think Zach and I are professional wedding guests. A few years ago we attended 12 weddings within one year, and majority of them were within just the summer months.
Summer wedding guest attire can vary depending on the time of day with lighter fabrics and colors reserved for daytime affairs -- BUT NOT WHITE or anything close to white. Come on, you know better. While we're on the subject of not wearing white, let's also stay away from champagne or a light taupe. Just steer clear of that whole part of the color wheel because you will be talked about and shunned. Rant over.
Here are a few absolutely adorable options...
via Nordstrom
via Loft
via J.Crew
via Zappos
via Nordstrom
You can dress these items for day with a softer natural makeup look, heel or wedge sandals, fun jewelry and a more casual hairstyle, or dress them up for evening with a smoky eye or a bright lipstick, hair pulled back or in soft waves and some statement jewelry. In case, you're wondering what dress I'll be wearing to Maeci's wedding, I am wearing this simple black dress:
via Zappos
I can't decide on what jewelry or shoes to wear though! So I need y'alls help. Would you wear a necklace with this? Just some statement earrings? Maybe some bangles? What shoes? Help a sista out, ladies. Leave your comments below!
Wednesday, June 25, 2014
Emily's Guest Room :: Before
My friend Emily reached out to me when Maeci and I first started our blog saying that she had a really great blog post idea - for us to redo her guest room! We totally jumped at the chance - getting to see an awesome friend + decorating = WIN WIN!
Emily's house is this adorable historic home in Birmingham in the Crestwood neighborhood that was built in the 1920s. It has a cozy front porch, little scalloped wood detail in the kitchen, hardwood floors throughout, the original stove (it's amazing) and all the quintessential details of a home built during that time.
So let's get down to the nitty gritty details of the before photos!


I hear that bad before pictures (photographers fault, not home owners fault) make for reallyyyy great after photos. That's just what I've heard. We're really excited to get started and have this room guest-ready. We'll be posting updates on the room as we go, and I'm in the midst of putting together a mood board and sending a few items to Emily to choose from!
Emily's house is this adorable historic home in Birmingham in the Crestwood neighborhood that was built in the 1920s. It has a cozy front porch, little scalloped wood detail in the kitchen, hardwood floors throughout, the original stove (it's amazing) and all the quintessential details of a home built during that time.
So let's get down to the nitty gritty details of the before photos!
I hear that bad before pictures (photographers fault, not home owners fault) make for reallyyyy great after photos. That's just what I've heard. We're really excited to get started and have this room guest-ready. We'll be posting updates on the room as we go, and I'm in the midst of putting together a mood board and sending a few items to Emily to choose from!
Tuesday, June 24, 2014
Celebrity Look for Less
Confession: I've been binge watching Pretty Little Liars on Netflix for the past three-ish weeks, and I've already made it halfway through season 4. I'm addicted.
So it's only natural that I would choose one of the stars of the show - Lucy Hale, who plays Aria Montgomery - as my fashion inspiration for today's post. Bonus: Lucy is a fellow Southerner, hailing from Memphis.
Here is Lucy's look while running errands around Hollywood...
And, here's how you can get the look...
Is this a look that you'd wear around town? Whose style are you loving these days?
So it's only natural that I would choose one of the stars of the show - Lucy Hale, who plays Aria Montgomery - as my fashion inspiration for today's post. Bonus: Lucy is a fellow Southerner, hailing from Memphis.
Here is Lucy's look while running errands around Hollywood...
 |
| Via |
 |
| H&M top, Topshop jeans, RayBan sunglasses, Nine West bag Mossimo heels, Elephant pendant, Horn pendant necklace |
Monday, June 23, 2014
Link Love
1 :: I could totally see this stool working in a multitude of rooms (indoor + outdoor!).
2 :: This bathroom redo is spot on.

3 :: This recipe looks so fresh delicious - perfect for summer.
4 :: Absolutely love this lamp finial and it comes in lots of colors!
5 :: Loving this cozy living room with its amazing gallery wall.

6 :: DIY gel nails at home with no UV light required. Sign us up!
7 :: I'm going to find a way to use this pendant in our house.
8 :: How gorgeous is this beauty?!

9 :: Is it bad that I want to make one of these for myself?
10 :: This stuff works wonders and I use it every day.
2 :: This bathroom redo is spot on.
3 :: This recipe looks so fresh delicious - perfect for summer.
4 :: Absolutely love this lamp finial and it comes in lots of colors!
5 :: Loving this cozy living room with its amazing gallery wall.
6 :: DIY gel nails at home with no UV light required. Sign us up!
7 :: I'm going to find a way to use this pendant in our house.
8 :: How gorgeous is this beauty?!
9 :: Is it bad that I want to make one of these for myself?
10 :: This stuff works wonders and I use it every day.
Happy Monday!
Friday, June 20, 2014
Friday Funny
It's been a long week...like "it's 9pm and I'm ready to get in bed and sleep until 9am" kind of week. So, if your week has been anything like mine, you need a little mental break; and, this adorable video did just the trick for me.
She makes a great argument, right?
Happy weekend!
Thursday, June 19, 2014
DIY Gel Nails

I'm a huge fan of gel polish manicures, but they can get pretty expensive pretty fast especially if you're getting them done every two to three weeks. So in an effort to cut down on time at the nail salon (don't worry, I'll still be going in every so often to get these crazy cuticles under control), I went on the hunt for an at home solution that didn't include buying my own gel kit.
After a bit of searching, I stumbled upon Gelous Advanced Nail Gel Coat, and thought I'd give it a try! When I was checking out at Sally's, the lady at the counter said the Gelous was great and they hadn't gotten a single complaint about it yet. So I gathered all of my nail polish supplies:
- Seche Vite Dry Fast Top Coat
- American Classics Gelous Advanced Nail Gel Coat
- Ulta Salon Formula Nail Lacquer in Eye Popping Poppy

Let's get started!
- Begin by applying two thin coats of Gelous to your clean dry nails, allowing a few minutes in between each coat for it to dry (about 3 or so minutes).
- Once the Gelous has dried, apply a thin coat of your color nail polish and let it dry (5 minutes or so).
- Apply a thin coat of Gelous and let that dry (2-3 minutes) making sure to swipe the tips of your nails to seal in the edges.
- Apply another thin coat of your color nail polish, let that dry (2-3 minutes).
- Apply your top coat (you want it to be a fast drying and Seche Vite is my new favorite - I don't know how I'm just now starting to use it!).
- Let all of those layers dry and you're done!
I did my nails right after dinner so they had a bit of time to dry before I went to bed. I let them dry overnight and when I woke up in the morning I was sure I would have sheet marks - but I didn't! Victory! I don't think this will last two weeks or more like normal gel nail polish, but if it can hold up for a week that's better than any regular polish in my book!

I'll post an update to this DIY to see how long the polish lasts, but so far so good! It feels a bit stronger than my normal manicure so that's a hopeful sign!

Do you normally get gel polish done when you get your nails done? Let us know if you try this out and how you like it!
Wednesday, June 18, 2014
What's In My Virtual Shopping Cart?
I'm a big believer in online shopping. I rarely go shopping unless it's to a local shop where I can't purchase online. It's just so much easier to have everything delivered right to my door. Plus, it makes for a nice surprise when I get home from work!
Here are some of my recent online purchases...
Benefit They're Real! Mascara: I love this mascara. A friend told me about it after I asked if she was wearing false lashes (she wasn't). On a daily basis, I usually just use one coat for a more natural look. But, you can really glam it up with two or three coats. This mascara makes your lashes look full and long!
Sole Goddess Blister Protection Foot Balm: "Killer shoes don't have to kill your feet." I bought this for my wedding rehearsal and wedding day. I, for one, am totally miserable if my feet are hurting; it just ruins everything. This balm is supposed to create a protective barrier to prevent blisters and rubbing. And, it's not sticky and doesn't ruin your shoes. I will be rubbing this all over my feet come next weekend!
Kirribilla Whitney Dress: I have been DYING for this dress since last summer; I just couldn't bring myself to spend the money. So, as soon as it went on sale, I jumped. It's so pretty in person, and I love a peplum. I'm thinking about wearing it to my bridesmaids' luncheon and on our honeymoon.
Crocs Ballerina Estiva: You read that right...CROCS! I never thought I would buy a pair of Crocs, but these were too cute (and comfy!) to pass up. These are part of the Crocs Stefano Furiani Collection...they actually don't even have the word Crocs anywhere on the shoe, and the box just says Stefano Furiani. But, these babies are so comfortable and lightweight! I got these because I needed some comfy flats to wear on our honeymoon. I've already worn these to work a few times, and they're like walking on air. While I'll never buy the Crocs potato-looking shoes, I am sold on these!
Beryll Canvas Tote Bag: Have you heard about the TODAY Show's Steals and Deals? I'm absolutely obsessed. Every few weeks, they feature insane deals on all kinds of goodies. For example, this tote bag retails for $485 on beryll.com; I got it for $70 on Steals and Deals. You can follow TODAY on Facebook to find out when the deals are going on...they only last 24 hours.
What were some of your fave purchases lately? Did anything on my list catch your eye?
Here are some of my recent online purchases...
 |
| Via Birchbox |
 |
| Via Nordstrom |
 |
| Via Kirribilla |
 |
| Via Zappos |
 |
| Via Beryll c/o TODAY Show Steals and Deals |
Beryll Canvas Tote Bag: Have you heard about the TODAY Show's Steals and Deals? I'm absolutely obsessed. Every few weeks, they feature insane deals on all kinds of goodies. For example, this tote bag retails for $485 on beryll.com; I got it for $70 on Steals and Deals. You can follow TODAY on Facebook to find out when the deals are going on...they only last 24 hours.
What were some of your fave purchases lately? Did anything on my list catch your eye?
Tuesday, June 17, 2014
DIY Anthropologie Vase

A little while back, I saw this adorable dot planter at Anthropologie. And my first thought was, "Oh, hello there lovely." And my second thought was, "I kill plants." Okay, just kidding. But I really do. My second thought was, "I could totally make this."


1. Clean your vase off with water, making sure it's completely dry after.
2. Dip a toothpick into the paint lightly (you don't need much!).
3. Start adding dots with the paint in whatever pattern you'd like, making sure not to put too much paint on at once otherwise it will drip (I worked from the bottom up, let it dry overnight, continued with the top, then let it dry overnight again).
4. You're done! Enjoy your new vase!
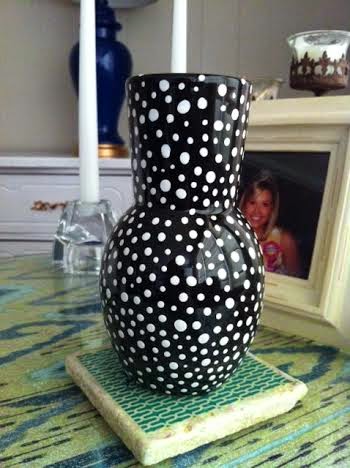
Let us know if you make one! Have you made any other Anthro dupes? We'd love to see your projects!
Monday, June 16, 2014
Lucky Duck
Last month, I was the lucky winner of a giveaway on Jewel's blog Eat.Drink.Shop.Love. I won a Jabra Solemate and was so excited to get in the mail!

It was super easy to set up and the sound is great. I turn on the bluetooth and can use it to listen to music or talk on speakerphone.

And I love the blue color of the speakers and the fact that it comes in a ton of other colors!

So if you need me, I'll be enjoying my new toy :)
Thanks again to Jewel for hosting the giveaway!
These opinions are all my own. I haven't been compensated for this post; just wanted to share my love for the product.
It was super easy to set up and the sound is great. I turn on the bluetooth and can use it to listen to music or talk on speakerphone.
And I love the blue color of the speakers and the fact that it comes in a ton of other colors!
So if you need me, I'll be enjoying my new toy :)
Thanks again to Jewel for hosting the giveaway!
These opinions are all my own. I haven't been compensated for this post; just wanted to share my love for the product.
Thursday, June 12, 2014
Drab to Fab: Farmhouse Paint
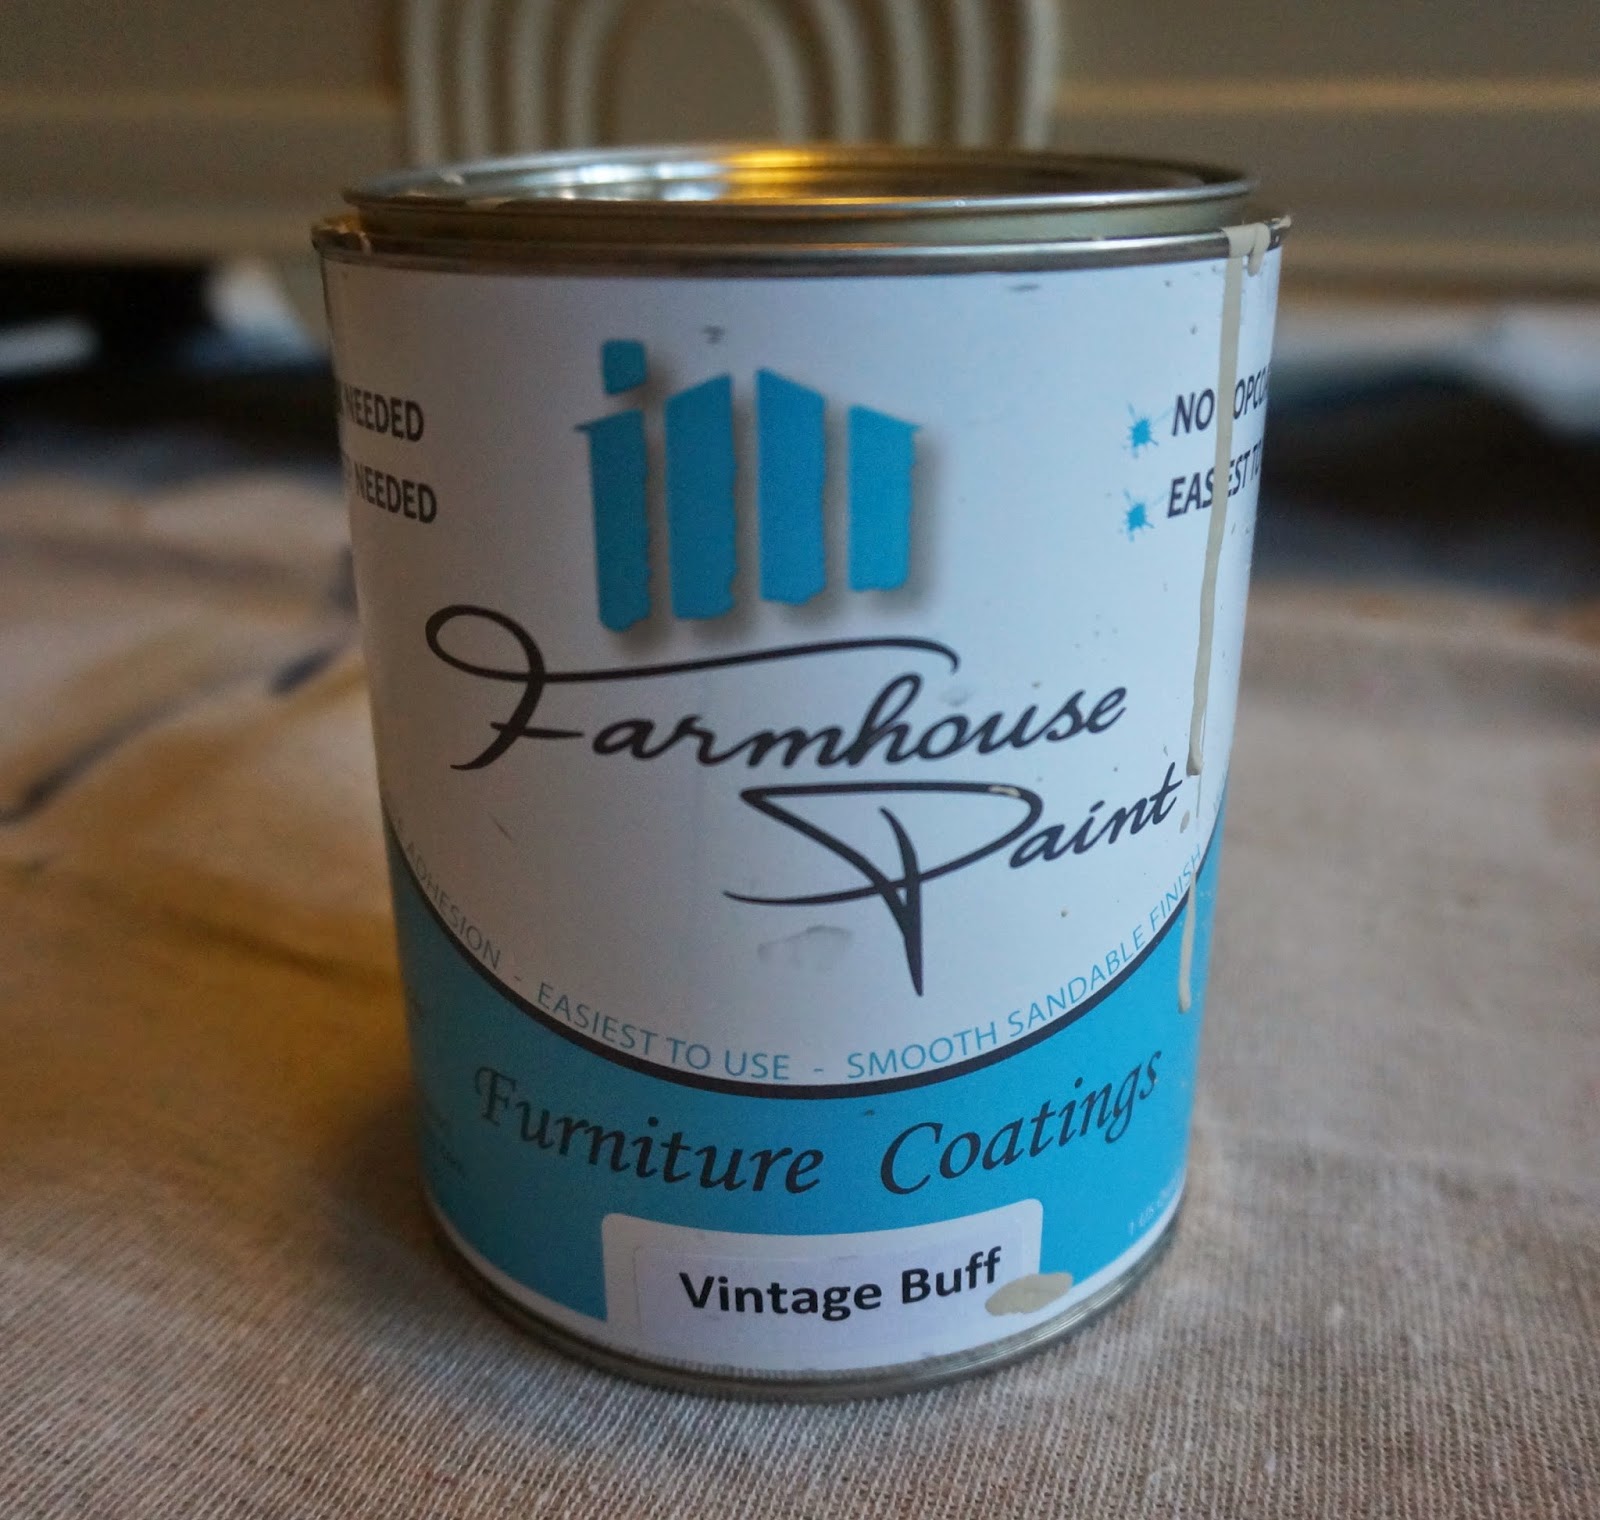
I've gotten hold of another piece of furniture, and I've been dying to to try this Farmhouse Paint.
Farmhouse Paint is similar to Annie Sloan Chalk Paint; it sticks to just about anything, and you don't have to sand or prime the surface before applying it. The difference in the Farmhouse Paint is that you don't have to wax it after applying. I've never used chalk paint, but supposedly, the waxing is the hardest part.
R.B.'s mom, Belle, gave me this old cedar chest that's been sitting in her garage for awhile. She thinks it was her grandmother's, so it's pretty old.

It has this cool art deco look to it, but it was in need of some major love.

First, I had to wipe down the whole thing to remove all the dust and spider webs (eek!). I used a wet towel first and then mixed some white vinegar with hot water and wiped it down again. That made a world of difference.
I picked out the Vintage Buff color in the quart size ($32) from local shop, Quite the Pair. They gave me a tip sheet and sent me on my way. They do offer painting classes if you want to practice and get hands on experience, but I was ready to get right to it.
The first coat of paint acts like a primer. At first, I thought I was doing something wrong because it seemed to dry super fast. But, after two more coats, things got easier and looked much better.
 |
| This is after three coats. |

After letting it dry completely, I started sanding. I used a 220 grit sandpaper to sand the whole thing. This helps give the paint a smooth finish. I then used a more coarse sandpaper to give it a more distressed look.

You can distress it as much or as little as you like.
I decided to add a little more dimension by applying a gold leaf rub to the decorative arches.
 |
| Sorry for the blurriness. |


I plan on using this in the sunroom for storage. I'm not quite sure how I feel about the final product. I may go back and distress it a little more on the top and front. But, it works for now.
Overall, I really liked the Farmhouse Paint. It's easy to use and offers really great coverage. It also comes in several different colors, and they have a metallic line coming out soon!
What do you think? Have you tried the Farmhouse or Chalk Paint?
Wednesday, June 11, 2014
Currently Crushing: Grasscloth Wallpaper
Grasscloth wallpaper has been a thing for a little while. We've come a long way since the basic, dark brown grasscloth of our 90s past. It was actually Maeci that got me thinking about the subject of grasscloth last week, and how gorgeous it looks (she's thinking of putting it in the bedroom after the wedding - surprise RB!). It comes in lots of colors and is classic and completely dynamic - looks great in a bedroom, bathroom, living room, a-n-y-w-h-e-r-e.
So, I pulled a few of my favorite grasscloth wallpaper images that I know y'all will love, too...


Aren't the mint and navy grasscloth uh-mazing? Mmmm hmmm, thought so. Have any of you used grasscloth wallpaper in your home? Would you?
Subscribe to:
Posts (Atom)