Showing posts with label budget-friendly. Show all posts

Tuesday, July 29, 2014

DIY Gold Corner Frames

Happy Tuesday!  If you missed our post last week on the DIY Picasso animal art, be sure to check it out!  It's the perfect easy art project to use in a grouping of frames - or even just one on its own.  Okay, on to the frames now!


Here's what you'll need:
You'll want to start by measuring a few inches from the corner of your frame.  I measured in two inches and really just eyeballed how I wanted it to look.  So if your frames are smaller, you might want to decrease the measurement and increase if your frames are a bit bigger.  I marked in two inches from each corner on each corner of the frame.


I then taped off the corners exactly at the two-inch mark, making sure to press down a bit on the tape to seal the edges (don't want that paint to seep through!).


You'll be left with a frame that resembles this...


Before you start using your Rub 'N Buff, you'll want to work it around a bit inside the tube so the paint is a bit more mixed together. Then, using a paint brush or your finger (you can use gloves to make it less messy, but I just dove right in) rub on the paint until it covers the surface.


Continue doing so until all of the corners are covered.  You may need to go over a few spots twice depending on the coverage.  Let it dry overnight and you're done.  Step back and admire your work!


The frames have a new home above our fireplace mantel, but by the time I realized I needed to take a photo it was dark out and the pictures just weren't up to par - so I'll update another day this week! #bloggerprobs

Friday, July 25, 2014

DIY Picasso Animal Art

We moved into our new rental house in November, but it all happened so quickly that it's been hard to get organized and decorate and all that jazz.  I've had six of these Ikea Nyttja frames for quite some time now, but couldn't figure out what or where I wanted to hang in them until I realized (duh) that I should try and recreate my favorite living room look!

So, I started with the art and picked up some mixed media paper, printed out a few of my favorite Picasso animal images (you may need to adjust the size of the images when printing) and got to work.


I started by taking my images and centering them on top of my art paper.  I traced over the lines with a thick ball point pen.  Doing so, left an imprint of the traced item on my art paper...


Since I didn't want the background of my art paper to be stark white, I used a small foam paint brush and some light gray watercolor to age the paper a bit and make it stand out against the white mat.

Side note: Those aren't really mats!  After finding out that the most basic of mats for these six frames would be more than $130, I decided to use thick cardstock and an exacto knife to create the illusion of mats.  Bada-bing. Bada-BOOM.

I used a thin black sharpie to go over the imprint leaving me with this...


I finished up the remaining animals and placed them in the frames (DIY on the frames soon!)...


I'm already loving how they look!  We'll be posting the DIY on the frames next week and showing you where their new spot in the house is.

Have a great weekend!

Tuesday, July 1, 2014

DIY Gel Nails :: Update

If you missed the how-to on our at-home DIY gel nails manicure, you'll definitely want to check it out after you see how my mani stayed in place for a full seven days!  Since it worked so well, I knew I had to update so y'all could see for yourself...

It wasn't until Day 7 that I had even one tiny chip.  You can see it on the corner of my pointer finger on the Day 7 photo.  I really couldn't believe how well our tutorial worked and how long it lasted, and will absolutely be using this method all the time.  I love a good salon mani, but this will be my go-to method for when I can't get to the salon and don't want to fork out the dough.

I'll also point out that a good top coat is essential - so make sure to check out what we used on the DIY tutorial!

Have you guys used our tutorial?  If so, send us your pictures!  We'd love to show off y'alls manicures!  Do you have any tips or tricks to making your mani last?

Monday, June 23, 2014

Link Love

1  ::  I could totally see this stool working in a multitude of rooms (indoor + outdoor!).
2  ::  This bathroom redo is spot on.


3  ::  This recipe looks so fresh delicious - perfect for summer.
4  ::  Absolutely love this lamp finial and it comes in lots of colors!
5  ::  Loving this cozy living room with its amazing gallery wall.


6  ::  DIY gel nails at home with no UV light required.  Sign us up!
7  ::  I'm going to find a way to use this pendant in our house.
8  ::  How gorgeous is this beauty?!


9  ::  Is it bad that I want to make one of these for myself?
10  ::  This stuff works wonders and I use it every day.

Happy Monday!

Tuesday, June 17, 2014

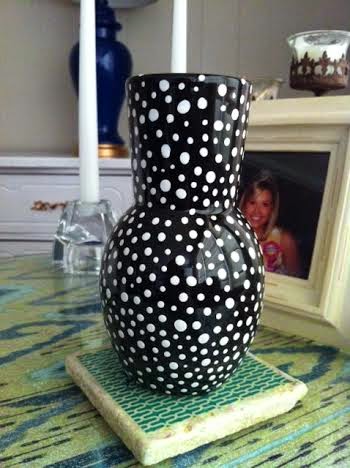
DIY Anthropologie Vase


A little while back, I saw this adorable dot planter at Anthropologie.  And my first thought was, "Oh, hello there lovely."  And my second thought was, "I kill plants."  Okay, just kidding.  But I really do.  My second thought was, "I could totally make this."


What's even better is that you only need three supplies for this project.  Hollaaaa.  So here's what you'll need:
Yup. That's it.  I used Rustoleum's oil-based gloss white paint.  And here are the steps you'll need to take:

1.  Clean your vase off with water, making sure it's completely dry after.
2.  Dip a toothpick into the paint lightly (you don't need much!).
3.  Start adding dots with the paint in whatever pattern you'd like, making sure not to put too much paint on at once otherwise it will drip (I worked from the bottom up, let it dry overnight, continued with the top, then let it dry overnight again).
4.  You're done!  Enjoy your new vase!


Let us know if you make one!  Have you made any other Anthro dupes?  We'd love to see your projects!

Wednesday, May 21, 2014

DIY Gold Elephant


For those of you who followed me over at The Eclectic Owl, you may have already seen this DIY, but we thought it was too good not to share here!  While I was checking out at Joann's one day last year, I saw this gray toy elephant (Roll Tide!) in the checkout aisle...


Now, while cute on its own, he wasn't terribly stylish. So, I gathered my supplies to make him a bronze gold beauty!


Here is what you'll need:
  • 1 plastic toy animal
  • white primer spray paint
  • metallic gold spray paint
  • clear acrylic sealer
Instructions:

Begin by priming the toy on all sides.  I found it best to put the toy on its back and spray with primer.  Then once that has dried, turn the toy on one side, then the other and finally place it in the standing position making sure that it is dry in between movements.  Once you have finished the first coat of primer, repeat the previous steps with a second coat of primer.

Repeat the application process with the gold spray paint, doing two coats.

Repeat the application process with the clear acrylic sealer, doing just one coat.  Let it dry completely and you're done!


Now you have an adorable gold elephant for your bookcase for under $10!  After I did mine last year, Maeci did one, too!  I think it turned out SO great and totally looks like a little brass elephant...


So cute, right?


And do you see that in the mirror?  It's the DIY feather gold art tutorial we showed you last month!


So go make one and send us your photos!

Also, make sure to 'like' Zelda + Madeline on Facebook and follow us on Twitter!  Once we reach 300 Facebook 'likes,' we'll be hosting another giveaway!  So, go on with ya bad self.

Monday, April 28, 2014

2014 Mother's Day Gift Guide

Mother's Day is just around the corner (Sunday, May 11), so we've put together a list of some unique gifts for your lovely mothers that they're sure to adore. 


1. Blooms by Heinau: Why give your mom flowers that are sure to wilt in a matter of days? These beautiful, natural flowers will stay fresh for over 6 months, and they're not even silk! The flowers absorb moisture from the air in order to stay fresh for months on end. A gift that keeps on giving!
2. Nautical Cheese Spreaders: Does your mom love to entertain? Then, get her these adorable nautical-themed cheese spreaders from C. Wonder. Bonus - you can take them on a picnic to the beach and be the trendiest family around!
3. Henri Bendel Candles: I absolutely LOVE these candles. My favorites are the Firewood and Mint Julep, and when they're burned at the same time, the smell is just divine! I have given these as gifts in the past, and they're always a hit!
4. Agate Coasters: Give your mom a beautiful AND functional gift! These coasters from High Street Market serve a functional purpose during parties, but also look great just sitting on your coffee table every day. 
5. Farmers' Market Herb Wreath: Isn't this wreath beautiful? I love it so much, I added it to our wedding registry! But, I know your mom would also love receiving this gorgeous gift. 
6. Yoga Mat Bag: With this handy yoga mat bag from Red Envelope, your mom can go straight from the office to yoga with Salvadore (Couples Retreat reference!) and look great doing it. 

And, if you want to get crafty, you should take a page out of Kelley's book and make this cute tassel necklace. Not only will your mom love her stylish gift, she'll feel extra loved knowing you spent time making the gift yourself. 

What are you planning to get your mom for Mother's Day? Is there anything you would add to the list?

Whether it's a gift, card, phone call, or combination of the three, we hope you'll be sure to let your mom know how much she means to you on Mother's Day and every day!