Showing posts with label diy. Show all posts

Monday, August 4, 2014

Mantel Decor

The DIY Picasso art and the DIY gold corner picture frames made their home above our mantel late last week!


I purchased the federal mirror last year from the same place I got our rug a few months ago.  The mirror might be my favorite piece in the whole house.  Clearly, I have a thing for gold.  And aren't these little Staffordshire dogs adorable with their spots?!


I picked up the Staffordshire dogs from a local antique hotspot called Eastbrook Flea Market.  If you're in the area, you need to check it out.


This is our mantel for now, but I'm sure I'll switch things up with the items sitting on the mantel.  If I do, I'll let y'all know!

Tuesday, July 29, 2014

DIY Gold Corner Frames

Happy Tuesday!  If you missed our post last week on the DIY Picasso animal art, be sure to check it out!  It's the perfect easy art project to use in a grouping of frames - or even just one on its own.  Okay, on to the frames now!


Here's what you'll need:
You'll want to start by measuring a few inches from the corner of your frame.  I measured in two inches and really just eyeballed how I wanted it to look.  So if your frames are smaller, you might want to decrease the measurement and increase if your frames are a bit bigger.  I marked in two inches from each corner on each corner of the frame.


I then taped off the corners exactly at the two-inch mark, making sure to press down a bit on the tape to seal the edges (don't want that paint to seep through!).


You'll be left with a frame that resembles this...


Before you start using your Rub 'N Buff, you'll want to work it around a bit inside the tube so the paint is a bit more mixed together. Then, using a paint brush or your finger (you can use gloves to make it less messy, but I just dove right in) rub on the paint until it covers the surface.


Continue doing so until all of the corners are covered.  You may need to go over a few spots twice depending on the coverage.  Let it dry overnight and you're done.  Step back and admire your work!


The frames have a new home above our fireplace mantel, but by the time I realized I needed to take a photo it was dark out and the pictures just weren't up to par - so I'll update another day this week! #bloggerprobs

Friday, July 25, 2014

DIY Picasso Animal Art

We moved into our new rental house in November, but it all happened so quickly that it's been hard to get organized and decorate and all that jazz.  I've had six of these Ikea Nyttja frames for quite some time now, but couldn't figure out what or where I wanted to hang in them until I realized (duh) that I should try and recreate my favorite living room look!

So, I started with the art and picked up some mixed media paper, printed out a few of my favorite Picasso animal images (you may need to adjust the size of the images when printing) and got to work.


I started by taking my images and centering them on top of my art paper.  I traced over the lines with a thick ball point pen.  Doing so, left an imprint of the traced item on my art paper...


Since I didn't want the background of my art paper to be stark white, I used a small foam paint brush and some light gray watercolor to age the paper a bit and make it stand out against the white mat.

Side note: Those aren't really mats!  After finding out that the most basic of mats for these six frames would be more than $130, I decided to use thick cardstock and an exacto knife to create the illusion of mats.  Bada-bing. Bada-BOOM.

I used a thin black sharpie to go over the imprint leaving me with this...


I finished up the remaining animals and placed them in the frames (DIY on the frames soon!)...


I'm already loving how they look!  We'll be posting the DIY on the frames next week and showing you where their new spot in the house is.

Have a great weekend!

Tuesday, July 1, 2014

DIY Gel Nails :: Update

If you missed the how-to on our at-home DIY gel nails manicure, you'll definitely want to check it out after you see how my mani stayed in place for a full seven days!  Since it worked so well, I knew I had to update so y'all could see for yourself...

It wasn't until Day 7 that I had even one tiny chip.  You can see it on the corner of my pointer finger on the Day 7 photo.  I really couldn't believe how well our tutorial worked and how long it lasted, and will absolutely be using this method all the time.  I love a good salon mani, but this will be my go-to method for when I can't get to the salon and don't want to fork out the dough.

I'll also point out that a good top coat is essential - so make sure to check out what we used on the DIY tutorial!

Have you guys used our tutorial?  If so, send us your pictures!  We'd love to show off y'alls manicures!  Do you have any tips or tricks to making your mani last?

Monday, June 23, 2014

Link Love

1  ::  I could totally see this stool working in a multitude of rooms (indoor + outdoor!).
2  ::  This bathroom redo is spot on.


3  ::  This recipe looks so fresh delicious - perfect for summer.
4  ::  Absolutely love this lamp finial and it comes in lots of colors!
5  ::  Loving this cozy living room with its amazing gallery wall.


6  ::  DIY gel nails at home with no UV light required.  Sign us up!
7  ::  I'm going to find a way to use this pendant in our house.
8  ::  How gorgeous is this beauty?!


9  ::  Is it bad that I want to make one of these for myself?
10  ::  This stuff works wonders and I use it every day.

Happy Monday!

Thursday, June 19, 2014

DIY Gel Nails


I'm a huge fan of gel polish manicures, but they can get pretty expensive pretty fast especially if you're getting them done every two to three weeks. So in an effort to cut down on time at the nail salon (don't worry, I'll still be going in every so often to get these crazy cuticles under control), I went on the hunt for an at home solution that didn't include buying my own gel kit.

After a bit of searching, I stumbled upon Gelous Advanced Nail Gel Coat, and thought I'd give it a try!  When I was checking out at Sally's, the lady at the counter said the Gelous was great and they hadn't gotten a single complaint about it yet.  So I gathered all of my nail polish supplies:


Let's get started!
  • Begin by applying two thin coats of Gelous to your clean dry nails, allowing a few minutes in between each coat for it to dry (about 3 or so minutes).
  • Once the Gelous has dried, apply a thin coat of your color nail polish and let it dry (5 minutes or so).
  • Apply a thin coat of Gelous and let that dry (2-3 minutes) making sure to swipe the tips of your nails to seal in the edges.
  • Apply another thin coat of your color nail polish, let that dry (2-3 minutes).
  • Apply your top coat (you want it to be a fast drying and Seche Vite is my new favorite - I don't know how I'm just now starting to use it!).
  • Let all of those layers dry and you're done!
I did my nails right after dinner so they had a bit of time to dry before I went to bed.  I let them dry overnight and when I woke up in the morning I was sure I would have sheet marks - but I didn't!  Victory!  I don't think this will last two weeks or more like normal gel nail polish, but if it can hold up for a week that's better than any regular polish in my book!


I'll post an update to this DIY to see how long the polish lasts, but so far so good!  It feels a bit stronger than my normal manicure so that's a hopeful sign!


Do you normally get gel polish done when you get your nails done?  Let us know if you try this out and how you like it!

Tuesday, June 17, 2014

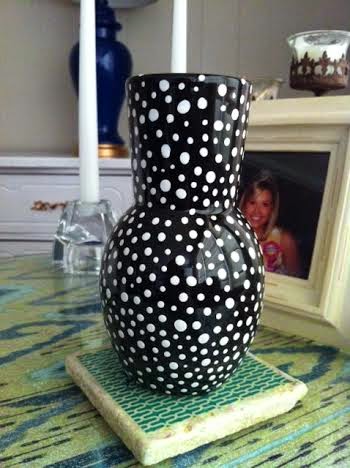
DIY Anthropologie Vase


A little while back, I saw this adorable dot planter at Anthropologie.  And my first thought was, "Oh, hello there lovely."  And my second thought was, "I kill plants."  Okay, just kidding.  But I really do.  My second thought was, "I could totally make this."


What's even better is that you only need three supplies for this project.  Hollaaaa.  So here's what you'll need:
Yup. That's it.  I used Rustoleum's oil-based gloss white paint.  And here are the steps you'll need to take:

1.  Clean your vase off with water, making sure it's completely dry after.
2.  Dip a toothpick into the paint lightly (you don't need much!).
3.  Start adding dots with the paint in whatever pattern you'd like, making sure not to put too much paint on at once otherwise it will drip (I worked from the bottom up, let it dry overnight, continued with the top, then let it dry overnight again).
4.  You're done!  Enjoy your new vase!


Let us know if you make one!  Have you made any other Anthro dupes?  We'd love to see your projects!

Monday, May 26, 2014

Link Love

Last week, I ran across several things I'm loving (what's new, right?).  So, I thought I'd share some with y'all!


1 ::  This post has me thinking I'll be going bold the next time I paint a room.
2 ::  I purchased this shirt over the weekend and want to buy about 10 more.
3 ::  This solution is great if you have a short window and want the room to look bigger.


4 ::  This guest room update has me itching to redo ours.
5 ::  I'm a huge fan of gingham print, and this outfit is absolute perfection.


6 ::  I'm finding a piece of furniture to do this to asap.
7 ::  I'm super jealous of this Craigslist find.
8 ::  These DIY storage boxes are cute enough to have in every room of your house.


9 ::  I'm loving these spring table settings.
10 ::  Thinking this would be a great addition to our living room.

Happy Memorial Day!

Wednesday, May 21, 2014

DIY Gold Elephant


For those of you who followed me over at The Eclectic Owl, you may have already seen this DIY, but we thought it was too good not to share here!  While I was checking out at Joann's one day last year, I saw this gray toy elephant (Roll Tide!) in the checkout aisle...


Now, while cute on its own, he wasn't terribly stylish. So, I gathered my supplies to make him a bronze gold beauty!


Here is what you'll need:
  • 1 plastic toy animal
  • white primer spray paint
  • metallic gold spray paint
  • clear acrylic sealer
Instructions:

Begin by priming the toy on all sides.  I found it best to put the toy on its back and spray with primer.  Then once that has dried, turn the toy on one side, then the other and finally place it in the standing position making sure that it is dry in between movements.  Once you have finished the first coat of primer, repeat the previous steps with a second coat of primer.

Repeat the application process with the gold spray paint, doing two coats.

Repeat the application process with the clear acrylic sealer, doing just one coat.  Let it dry completely and you're done!


Now you have an adorable gold elephant for your bookcase for under $10!  After I did mine last year, Maeci did one, too!  I think it turned out SO great and totally looks like a little brass elephant...


So cute, right?


And do you see that in the mirror?  It's the DIY feather gold art tutorial we showed you last month!


So go make one and send us your photos!

Also, make sure to 'like' Zelda + Madeline on Facebook and follow us on Twitter!  Once we reach 300 Facebook 'likes,' we'll be hosting another giveaway!  So, go on with ya bad self.

Friday, May 16, 2014

Drab to Fab

Kelley and I love turning old furniture into something new. The easiest way to transform your old, boring furniture into something new and fabulous is by painting it. Paint makes such a huge difference, and it's fairly easy to do. 

R.B. has had this old armoire since he was in high school. He used it in college, and it's been sitting empty in his guest bedroom ever since. Instead of just throwing it out, I decided to paint it. And, I figured if it turned out horribly, we could just get rid of it.


Shout out to R.B. for trusting me to paint this inside the house!
I forgot to take a picture before we removed the hardware, so here's a close up. 


Before I started painting, I rubbed Klean Strip Easy Liquid Sander Deglosser over the entire armoire. 

Via
The deglosser works like sandpaper, but it's much easier and quicker to use. I rubbed two coats over every nook and cranny, and I think it really helped the paint adhere. And, it's made for indoor use. So, no chemical side effects, and it even has a pleasant minty smell.

The deglosser dries in about 15 minutes, so I was able to get right to painting. 

And, here's the finished product!

I need help with my photography skills. I don't know why this looks so yellow. 

I'm really happy with how it turned out. I used Behr Deep Royal High Gloss paint for the armoire and Rustoleum Gold Metallic spray paint for the hardware. I also sprayed a clear gloss over the hardware, just to protect it a little. It took two coats of paint, and let me tell you...painting woven fake wood is not enjoyable. Those doors were almost the death of me.

When I move into R.B.'s house after the wedding, we're planning to turn a very small bedroom into a walk-in closet (which I will add to the list of things I promise to document on Z+M!), and I plan to use this piece in there. But for now, it's just sitting sadly in an empty room. 

What do you think? Have you used high gloss paint on anything? Would you use such a bold color, or do you prefer something more subtle?

Thursday, April 24, 2014

DIY Tassel Necklace

So we've all seen those adorable tassel necklaces around, right?  So cute.  I die.  But I didn't want to spend $30 on one necklace that I knew I could easily make myself.  When I saw these tassel necklaces at Furbish, I knew I could make one nearly identical for less than half the price!

Image 1
via Furbish

So, I set out on gathering my supplies...


  • (2) Embroidery threads (Cotton Pearl #5 in Placid is the blue color I used)
  • Jump Ring (I used a 15mm heavy gauge jump ring in Gold from Hobby Lobby.  I couldn't find the exact one online, but these are the same size, same brand and nearly the same color.)
  • Wooden beads (I used two packages of these, but feel free to get creative!)
  • Scissors
  • Tape (Scotch tape or any sort will work.  This makes threading your beads easier.)

Instructions:

Start by taking your first embroidery thread and unwinding it, but keeping it intact as shown below.


You'll want to remove about 5-6 strands, still keeping the bulk of the thread intact.  After removing those few strands, take the larger piece and place it through one of the jump rings like so:


Then, cut through the loops at the ends of the embroidery thread of the larger piece (the one with the jump ring in the center).  You'll now have these two separate pieces:


Fold the piece in the jump ring in half making sure the ends match up...


Take the few strands you removed and tightly knot them around the base of the jump ring securing the larger strands...


Pull the strands so that half of them face downward and blend in with the other strands in your newly formed tassel (and excuse the fact that my manicure is a little cray-cray):


Snip off the top bits of thread from the one you used to secure the tassel, trim your tassel ends and fluff them up a bit!  The shorter your tassel the fluffier it will be (fluffier = technical term).


You can stop here and use your tassel on an existing chain OR continue on to create your own!

Next, you'll want to take your other package of embroidery thread and make it the length you desire for your necklace.  I started out with mine really long to ensure that I had enough thread to create little knots in between each bead.  You can also simply make it the length you'd like and add the beads to they touch back-to-back.  

Then take that thread and move it through the jump ring, making sure to tie it and knot it so that each side is the same length...


Now, you're going to make yourself comfortable and grab a glass of wine. And you're absolutely going to want to make sure there's a Law and Order SVU marathon on.  Okay, maybe that's only what I did.  We can't all be perfect.

Add a little tape to the end of your thread strands and start by putting one bead through.  Then make a knot after and continue with another bead.  Keep this going until your entire strand is finished.


And here are the two I made:


Oh, hello there.  Why yes, yes I am wearing two necklaces I made.


Super easy and super cute, right?!  So, now you can make one!  Be sure to let us know if you do.  We'd love to see yours!